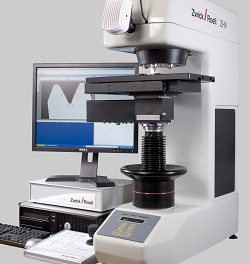
SIGNIFICANT investment at Keighley Laboratories led the company to expand its test house facilities to accommodate a new automatic hardness tester. Such is the footprint of the machine, a Zwick Roell ZHV-10 automatic micro and macro hardness tester supplied by Indentec, that the laboratory took the opportunity to enlarge its microscope room, creating a new optical suite to house a previously-acquired zoom stereo metallurgical microscope and providing space for further equipment.

Hardness testing made automatic: Zwick ZHV10
The ZHV-10 features fully automatic Vickers indentation measurement, and is expected to bring improvements in accuracy, repeatability and productivity to the company’s testing regime.
The hardness of a material is determined by measuring the permanent impression left by an indenter forced into its surface. Modern machinery components are expected to cope with ever-more arduous operating conditions, and hardness testing is a powerful method of assessing their fitness. In effect, hardness testing becomes part of the quality control process, says Indentec.
Keighley Labs employs hardness testing for its in-house Heat Treatment division, handling up to a dozen samples daily, as well as performing hardness tests for external clients.
Vickers testing uses a square-based pyramid diamond indenter, while the alternative Knoop test uses a rectangular-based pyramid. Either type of indenter can be used on the Zwick Roell ZHV-10, which features a built-in measuring microscope and camera. The machine is highly automated, with a motorised XY table, high-resolution monitor, and sample scanning facility, controlled by a Windows XP operating systems and Zwick Roell’s custom software.
Technicians can view and measure test impressions manually, or allow the machine to follow predefined patterns – indenting the sample, performing measurements, and generating test results – automatically. Tests can be programmed to follow a predetermined template, for example in a straight line or transverse pattern across a sample, or testing welded seams.
This ‘click and walk away’ functionality boosts productivity and ensures precise sample positioning and imaging, giving higher accuracy and repeatability. Standard testing procedure times are reduced from more than an hour manually, to less than 20 minutes automatically. Automation also eliminates operator errors such as those caused by eye strain and fatigue, which can be common in microhardness testing.
“The time savings will enable us to offer faster turnaround times and deliver even more accurate, repeatable and reproducible data,” says Keighley Labs’s test house manager, Matthew Mellor.
